

Cart
0

Last Updated: October 29, 2026
Quick Summary
The best bottle drying rack for a small kitchen is a compact vertical or fold-out design chosen by measurement, not looks. Measure your counter run, cabinet clearance, and depth first, then match peg spacing to your widest bottle neck and pick a rack with a removable, sloped drain tray.
- A rack that fits a 24-inch stretch can crowd a 12-inch gap between sink and stove.
- Vertical racks lose when upper-cabinet clearance is under about 14 inches.
- Wide-neck bottles commonly run about 2 to 2.25 inches across the neck.
- Empty the drain tray daily and wash the rack weekly in warm soapy water.
- A two-tier rack can hold six to eight bottles in a footprint barely wider than a single-tier rack.
Table of Contents
- Why Most Bottle Drying Racks Fail in a Small Kitchen
- Mistake 1: Buying Before You Measure the Counter
- Mistake 2: Ignoring Where the Water Actually Goes
- What to Look for in a Compact Baby Bottle Drying Rack
- Vertical Bottle Drying Rack Options That Save Counter Space
- When a High-Capacity Baby Bottle Drying Rack Makes Sense
- Picking a Bottle Drying Rack for Glass Bottles and Wide-Neck Shapes
- Drainage, Mold Prevention, and Keeping the Rack Clean
- Mistakes to Avoid Before You Add One to Your Cart
- Frequently Asked Questions
Why Most Bottle Drying Racks Fail in a Small Kitchen
A bottle drying rack is a countertop stand with pegs, prongs, or baskets that holds washed baby bottles and parts upright so air circulates and water drains away.
The failure almost never comes from the rack itself. It comes from how it was chosen. Parents buy on looks or reviews, not measurements, and small kitchens punish that shortcut harder than any other room.
Mistake 1: Buying Before You Measure the Counter
The most common mistake is ordering a rack before measuring the counter. For more small-space nursery setup ideas that pair with a compact drying zone, see these smart setups.
Watch out: leaving no clearance beside the rack means splashed water pools against the wall or under appliances, and that standing water is where mold starts.
Two more measurements matter just as much:
- Height under cabinets. A vertical rack with tall pegs can block upper cabinets from opening fully.
- Depth from the wall. A deep drain tray pushes bottles forward until they overhang the counter edge.
Write both numbers down before you shop. A rack that misses either one ends up on the floor or in the bathroom.
Mistake 2: Ignoring Where the Water Actually Goes
Drainage is the feature parents notice last and regret most. Water has to leave the rack and land somewhere you can empty easily.
USDA Food Safety and Inspection Service guidance on cleaning and sanitizing food contact surfaces makes the point plainly: moisture left sitting on a surface gives bacteria and mold a place to grow.
Look for a tray with a clear slope toward one corner, a spout or lip you can tip into the sink, and a design you can remove without disassembling the whole rack.
What to Look for in a Compact Baby Bottle Drying Rack
A compact baby bottle drying rack earns its place when it holds a full day of bottles in a footprint you can spare. Judge it on four things: measured footprint, usable capacity, peg layout, and how easily it comes apart for cleaning. Everything else is decoration.
Footprint, Dimensions, and Rack Layout
Start with the base dimensions, not the marketing photos. A rack's footprint is the length times depth of its base, and that is the number your counter actually feels. Then check usable capacity: how many bottles it holds upright with caps and nipples in place, not stacked flat.
Peg layout decides whether that capacity is real. A 240ml bottle is a useful reference size when judging whether a rack's slots will hold a full feed without tipping.
A short checklist before you commit:
- Base footprint fits your measured counter run with clearance on both sides
- Height clears upper cabinets when the rack is loaded
- Peg spacing fits your widest bottle neck
Vertical Bottle Drying Rack Options That Save Counter Space
A vertical bottle drying rack trades width for height, which is exactly the trade a small kitchen wants.
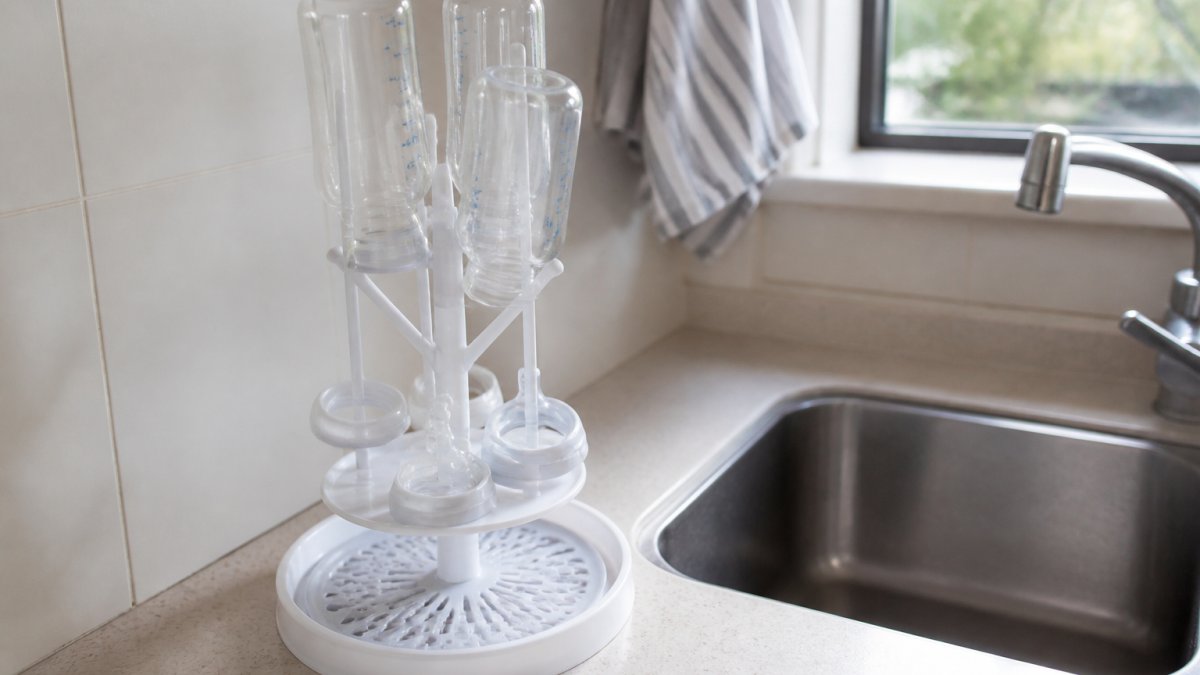
Three layouts, measured against a real counter strip
Picture a 12-inch-wide by 18-inch-deep strip of counter between the sink and the wall, a common squeeze in a small kitchen. Here is how each layout behaves in that space.
Peg tower. A round or square base roughly 7 to 9 inches across with tall prongs. In a 12-inch strip it leaves 3 to 5 inches of clearance on either side, enough to set down a bottle while you load the next one. Usable capacity is typically two to four bottles upright with caps and nipples on the pegs, plus a ring of short pegs for nipples and collars. The trade-off: a small base with tall prongs has a high center of gravity, so a full load of glass bottles can rock when the counter is bumped.
Fold-out rack. Hinged prongs fan open from a base often 10 to 14 inches long when deployed and collapse to roughly half that depth when folded. Capacity runs four to six bottles plus accessories.
Two-tier rack. A lower level for bottle bodies and an upper level for nipples, caps, and pump parts, on a base usually 10 to 13 inches wide and 8 to 10 inches deep. Because the second level stacks upward rather than outward, capacity can reach six to eight bottles in a footprint barely wider than a single-tier rack. The catch is height: a loaded two-tier rack can stand 12 to 15 inches tall, which may foul upper cabinets or a shelf above the counter.
The stability mechanism that matters more than the layout
Tall, narrow racks tip more easily than wide ones, especially when a toddler bumps the counter or a heavy glass bottle is set down off-center. Three design details decide whether a vertical rack stays put:
- Base weight and spread. A base wider than the peg cluster, or weighted with a metal plate or a low water-catching tray, resists tipping far better than a base the same width as the prongs.
- Prong angle. Prongs that splay slightly outward hold bottle mouths at a small angle, which lowers the load's center of gravity and lets water run off the rim instead of pooling in the cap threads.
- Non-slip feet. Rubber or silicone feet grip a wet counter; bare plastic or wire slides. This is the cheapest stability upgrade and the one most often missing from budget racks.
Set a vertical rack against a wall or backsplash so it has something to lean toward, and keep the heaviest bottles toward the center of the base rather than the perimeter.
When vertical is the wrong call
Vertical racks lose to horizontal or fold-flat designs in two situations. First, if your upper-cabinet clearance is under about 14 inches, a tall peg tower or two-tier rack will not fit loaded, and a fold-out rack that lies flatter is the better choice. Second, if you routinely dry unusually tall or wide bottles, half-gallon water bottles, tall travel mugs, or wide-mouth insulated cups, the prong spacing on a compact vertical rack may not accept them, and a rack with adjustable or widely spaced prongs earns its space instead.
When a High-Capacity Baby Bottle Drying Rack Makes Sense
A high-capacity baby bottle drying rack makes sense when you wash bottles once a day rather than after every feed.
The catch is that capacity and counter space pull against each other.
If your counter genuinely cannot spare the room, a high-capacity rack kept in a cabinet and brought out for the evening wash beats a small rack that overflows by noon.
Picking a Bottle Drying Rack for Glass Bottles and Wide-Neck Shapes
Bottle shape decides which rack works, and glass changes the math. Most rack listings describe capacity in bottle counts without saying which bottles, which is why a rack that holds eight narrow plastic bottles may hold four wide-neck glass ones. Match neck diameter, bottle height, and bottle weight to the rack's peg spacing, prong height, and base stability before you buy.
Neck diameter sets the minimum peg gap
Bottle necks cluster into a few rough sizes, and the gap between prongs has to clear the widest part of the neck plus the collar or ring that sits on it.
- Narrow-neck standard bottles typically have an outside neck diameter around 1.5 to 1.75 inches. Most racks with closely spaced thin pegs accept these, which is why narrow bottles are the easy case.
- Wide-neck bottles commonly run about 2 to 2.25 inches across the neck, and the collar adds a little more. A rack whose pegs are spaced for narrow necks will either refuse the wide bottle or force it to lean against its neighbor.
- Anti-colic and vented designs add a separate vent tube, diaphragm, or multi-part collar. These pieces need their own short pegs or a basket, not just a gap between bottle prongs.
A practical test before buying: measure your widest bottle neck with a ruler, add about a quarter inch for the collar, and compare that number to the peg gap in the product photos or spec sheet.
Glass changes the stability requirement
Glass bottles are heavier than plastic, and weight sits at the top of a vertical prong, the worst place for it. A rack that holds plastic bottles without complaint can rock or tip under a full load of glass.
- A base wider than the peg cluster, or a low, weighted tray that drops the center of gravity.
- Prongs that splay outward slightly, so the bottle leans into the rack rather than standing perfectly vertical on a narrow point.
- Coated prongs. Thin bare wire can scratch glass rims and chip the lip over time; vinyl-coated or silicone-sleeved prongs are gentler and also grip better.
Load glass bottles toward the center of the base and keep the perimeter pegs for plastic or accessories. If the rack has a drain tray, set the heaviest bottles over the tray's flat center rather than over a sloped edge.
Shape compatibility beyond neck size
Neck diameter is the first filter, but shape decides the rest:
- Tall bottles need prong height plus clearance above. A bottle that stands taller than the rack's prongs can still be dried, but it will not be held upright, and it may foul an upper cabinet.
- Angled or contoured bottles with a curved body can sit off-center on a straight prong; a rack with a basket or a wide cradle holds them better than a peg-only design.
- Insulated cups and travel mugs are wider and heavier than baby bottles and often exceed both the peg gap and the weight the rack was designed for. If the household dries these alongside bottles, choose a rack rated for cups or one with adjustable prongs.
Product pages on the Modocam Kids website list dimensions and shapes for bottles, so you can match peg spacing to the real thing rather than guessing from a product photo.
Watch Out
A rack that fits your bottles on day one can stop fitting after a switch to wide-neck or glass. If you are still building your bottle set, buy for the widest and heaviest bottle you expect to use, not the one you have now.
The short version: measure the neck, weigh the bottle, and check the base. A rack that clears all three will hold glass and wide-neck shapes without leaning, scratching, or tipping.
Drainage, Mold Prevention, and Keeping the Rack Clean
Mold prevention comes down to three habits: empty the tray daily, dry the rack between uses, and clean the parts that touch water at least weekly.
Make the cleaning routine short enough that you will actually do it:
- Lift out the drain tray and rinse it in the sink every day.
- Wipe the base and prongs dry once the bottles come off.
- Once a week, wash the rack in warm soapy water and scrub the corners where water collects.
- Check the joints and the underside of the tray for film or spots.
A silicone bottle brush can reach into tray corners and peg gaps more easily than a dishcloth, which tends to smear moisture around rather than remove it. Dishwasher-safe racks save time, but confirm the material first: bamboo and some plastics warp or crack in high heat, while stainless steel and most silicone hold up.
Mistakes to Avoid Before You Add One to Your Cart
The final check is the one most parents skip: matching the rack to how you actually wash bottles. Quick reference before you buy:
| Mistake | Fix | Why It Matters |
|---|---|---|
| Buying without measuring | Measure counter run, height, and depth | Prevents clutter and blocked cabinets |
| Ignoring drainage | Choose a removable, sloped drain tray | Stops standing water and mold |
| Wrong peg spacing | Match spacing to your widest bottle neck | Keeps glass and wide-neck bottles stable |
| Overbuying capacity | Size to your daily wash, not the maximum | Saves counter space you need elsewhere |
| Skipping the material check | Confirm dishwasher-safe materials | Avoids warping and early replacement |
One more point worth stating plainly: the biggest rack is rarely the best rack for a small kitchen. The right one holds a single day of bottles, drains cleanly, and leaves you room to cook.
Frequently Asked Questions
Which baby bottle drying rack takes up the least counter space?
A vertical bottle drying rack with a narrow base usually takes the least room because bottles stand upright instead of lying flat. Measure the depth of your counter from the wall to the sink edge before buying, then compare that number to the rack's listed dimensions. Foldable and removable peg designs help too, since you can collapse the rack when it is not in use. Aim for a footprint that leaves at least a hand's width of clear counter on each side.
How many bottles can a compact drying rack hold?
Most compact racks hold six to eight bottles plus their parts, while high-capacity models can fit twelve or more. The bottle count on the box is often optimistic, because nipples, caps and pump parts compete for the same pegs. Count your daily bottle load first: if you wash eight bottles a day, a rack rated for ten gives you room to dry everything at once. Check how many pegs and hooks are included, not just the bottle number.
Are vertical bottle drying racks better for small kitchens?
For tight counters, yes. A vertical bottle drying rack stacks bottles upright on pegs, so it uses height instead of surface area. That frees up prep space and keeps parts from spreading across the counter. The trade-off is stability: tall glass bottles need a rack with a weighted base or deep peg sockets to avoid tipping. If your counter is deep but narrow, a horizontal tray-style rack may still work fine.
How do you keep a bottle drying rack clean?
Empty and rinse the drain tray daily so standing water does not collect, then wipe the rack with warm soapy water weekly. Many plastic and stainless steel racks are dishwasher-safe on the top rack, but check the manufacturer's care instructions first, since bamboo and some coated materials should be hand-washed. Once a month, take the rack apart and scrub the pegs and tray corners where milk residue hides. A rack that stays damp is the fastest route to mold.
Small kitchens demand gear that earns its footprint, and a drying rack is no exception. Modocam Kids curates feeding essentials built around comfort and care, from bottles and brushes to the storage that keeps a compact kitchen organized. Browse our feeding collection to match a rack to the bottles you already own, and get started with Modocam Kids to build a drying setup that fits your counter and your routine.


